Hello friends of order and chaos and virtual worlds,
at the Annual Fractal Art Competition 2016 I have added an entry with a 360° stereoscopic 3D slideshow.
It should demonstrate, that it is possible to create stereoscopic 360° fractal images and so also animations.
360° stereoscopic 3D slideshow -
embedded player can't play 360° content - view directly at YouTube and activate 3D Anaglyph:
<a href="https://www.youtube.com/v/VaXQdOGE0Og&rel=1&fs=1&hd=1" target="_blank">https://www.youtube.com/v/VaXQdOGE0Og&rel=1&fs=1&hd=1</a>I will talk here about the rendering pipeline to create such images.
First some basics about stereoscopic 360° animations/films.
When you work with a prerendered material then your options are limited compared to live rendered content like in computer games.
The reason: You can't render, store, transport all possible two-eye image combinations. Thats why you can't tilt you head when viewing 360° videos. The camera is virtually fixed at a vertical line and can only rotate around this line like rotating your real head. Beside that rotation you can look up and down.
Without tilting one 360° image for left eye and one 360° image for right eye are enough to create the stereoscopic VR space.
Yeah cool, so let's do so and render a 360° image for left eye and a 360° image for right eye by simply setting Camera in Mandelbulb 3D to "360° Panorama" and render a left eye image and a right eye image via "Stereo" option or check "Render stereo animation" option in the Animation maker.
First results looks promising. When combining the left and right 360° images via Stereo Photo Maker the red parts were always left to the corresponding blue parts. Crossed eye view check with right image on left side and left image on right side looks good, at least in the center (later front of the 360° view).
But after discussing the topic at Mandelbulb Manics group at facebook and creating two testvideos our fractalist Julius Horsthuis gave the important hint that you get a stereo image on the back ... but it is flipped :-( So when you wear red-cyan glasses you have to turn them around to see the 3D correct. At the sides there is no stereo effect, so only front view is correct.
This was not so obvious with my first testanimation because there was not much fractal at the sides and backside -
embedded player can't play 360° content - view directly at YouTube and activate 3D Anaglyph:
<a href="https://www.youtube.com/v/qB0CXZfY1_c&rel=1&fs=1&hd=1" target="_blank">https://www.youtube.com/v/qB0CXZfY1_c&rel=1&fs=1&hd=1</a>But it was more obvious at the second testanimation at second 12 -
embedded player can't play 360° content - view directly at YouTube and activate 3D Anaglyph:
<a href="https://www.youtube.com/v/Tjt-qXS5FiA&rel=1&fs=1&hd=1" target="_blank">https://www.youtube.com/v/Tjt-qXS5FiA&rel=1&fs=1&hd=1</a>You have to turn around red-cyan glasses to see the bulb at the backside correct.
So "Good bye" to fractals in 360° stereoscopic 3D?
I hope not.
So what exactly is the problem?The problem is that we render a complete 360° view for each eye, but that view is only correct for the small part in the middle / front, the line that the camera primary focus.
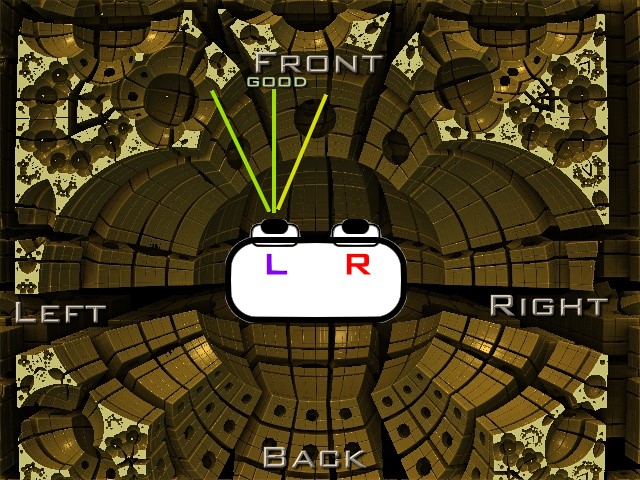
When we go to the side then the stereo effect fade away more and more.
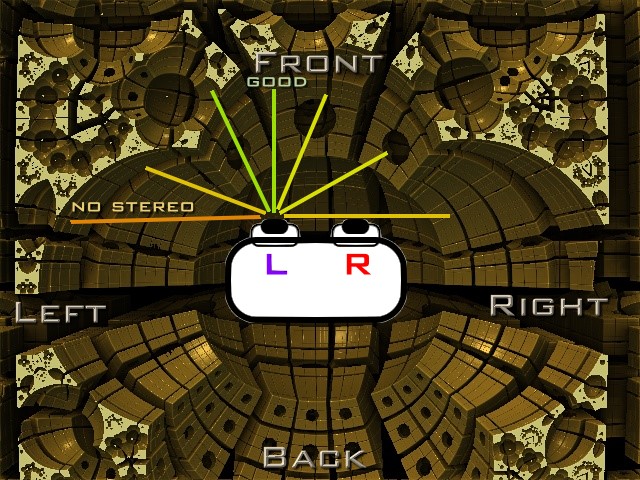
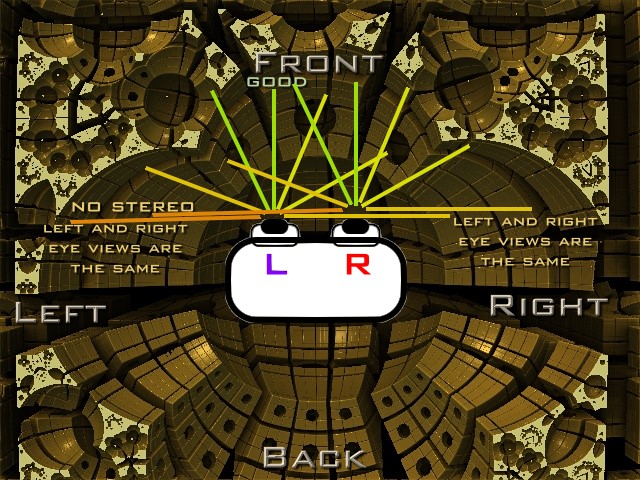
Left and right eye view are completly the same when we are at the exact side view (180°).
When it comes to our backside then everything gets worse ;-) When looking backwards the view that is rendered for the left eye should be the view for right eye and vice versa.
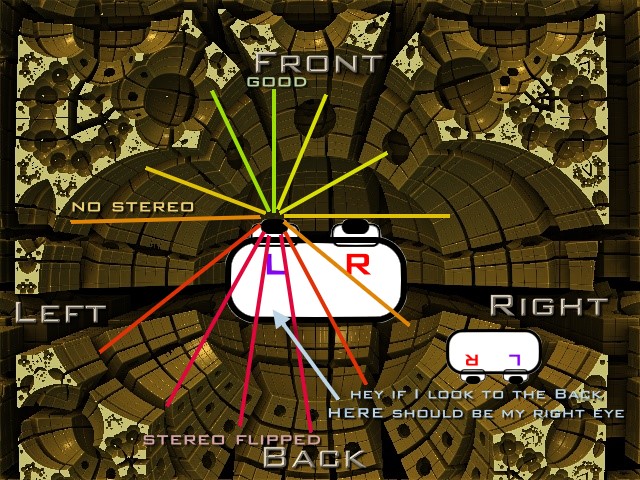
Look at the graphic before to get the "Aha"-moment ... Well, if you wan't to look backwards in a correct way, then you have to: TURN YOU HEAD!
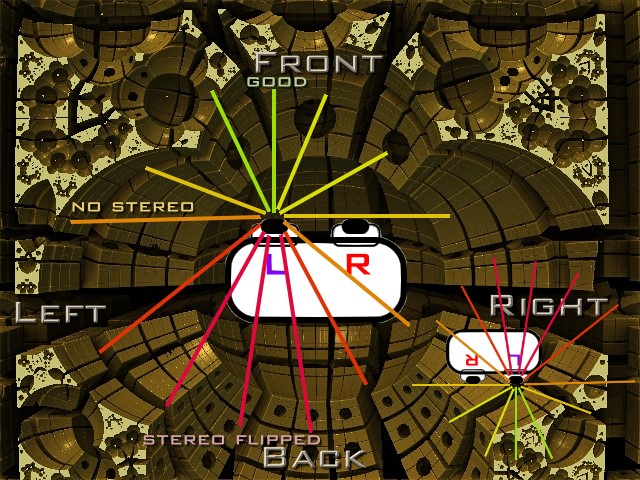
The same is true for the view at left or right side. Turn you head to get it right.
But...
Pessimist:
It is right, but always only in front of the camera/head. That doesn't work.Optimist:
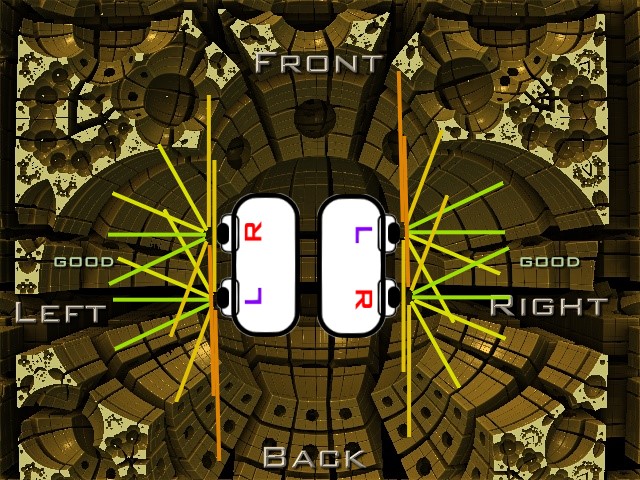
Yeah, if the front view for a specific horizontal head rotation is correct, then lets go...
Let us collect all these correct snippets and stitch them together to a new 360° image!
One time for the left eye and one time for the right eye.Pessimist:
You are crazy.Optimist:
I know :-)The Trick:So for each image in the slideshow I have rendered a stereo animation with 1920 frames (rendering time about 2 days). In this animation I do a complete 360° rotation of the camera around Y-axis.
From each of the 1920 frames I have cropped only a 1 pixel wide vertical line from the middle of the image. Because the camera rotates during the animation you get a kind of vertical scanline that scans the whole 360° sphere. The other 1919 lines of each image were not used.
Now simply stitch all these 1920 single lines together to get a clear 360° image. Do this for left eye images and right eye images separately to get a left eye 360° image and a right eye 360° image that has correct stereo properties.
There are some points you have to pay attention to. So here is my processing pipeline.
1. Mandelbulb 3DUse a suitable image with Camera lense set to 360° Panorama. It is good when there is some space at the top and the bottom and no near fractal surface, because top and bottom got twisted.
Go to 3D Navigator:
Open the lower panel if it is hidden.
Activate "Fixed zoom and steps". The Zoom shouldn't change for the keyframes.
Set Looking+Rolling angle to 90.
Click two times "Looking left" (j) so camera focus now the backside of the original image. This has the effect that your original front view will be in the middle of the stitched image and so will be displayed in front at YouTube.
Click "Ani keyfr. (f)" to set this backside-image as first keyframe in the Animation maker.
Go to Animation maker:
Activate "Loop animation" to get a smooth transition from last to first keyframe.
Activate "Render stereo animation"
Now think about the resolution the final image should have. Important is the width of the image. For my video I used a final width of 1920 pixels and height of 1080 pixels. So when we use the smallest possible scanline of 1 pixel width (best result) then we have to render 1920 frames.
I always use 4 keyframes for the complete 360° rotation, so I divided 1920/4 = 480. Thats why I had set "Subframes to render between" to 480.
For a better quality I have rendered the images in 2560x1440. I have shrinked them down to 1920x1080 with IrfanView and resample option to get a bit of Antialiasing. I did this before cropping the 1 pixel line, so the 1920pixel-480subframes thing still works.
Ok we have set the 480 subframes. Now go back to 3D Navi:
We still look at the backside.
Now click "Looking right" (l) once. Looking+Rolling angle was set to 90 so we did a 90° turn to the right.
Click "Ani keyfr. (f)" to get keyframe 2.
Now click "Looking right" (l) once. We are now looking to the original front view.
Click "Ani keyfr. (f)" to get keyframe 3.
Now click "Looking right" (l) once.
Click "Ani keyfr. (f)" to get keyframe 4.
Render all 4 keyframes and adjust lightning for each, so the middle of the image (that part we crop later) has perfect light.
Most often one or more lights are bound to your camera viewing angle and wander with the camera during animation. Thats why lightning in the stitched image is different compared to the original 360° image.
It is a good idea to render a preview animation to check the lights. At that preview you can also see how strange the top and bottom behaves. They move in the opposite direction than the middle. When you render a stereo animation then rotation of stereo-camera is around the middle between both eyes. So both eyes are not fixed but move on a circle during the animation. Looks like this also happens when you render a non-stereo animation.
That opposite movement creates strange twisted objects in the resulting stitched image. Thats why it is a good idea to use an image where there is some space at top and bottom because at far distance the effect is not so strong.
I have created a fadeout to black at top and bottom in the final stitched images. This helps to hide that unwanted twist.
As a last step you should test the stereo parameters. I have changed them a bit for each image. For testing I rendered for one frame the left and right image. Viewed right eye image on left screen and left eye image on right screen, then I cross my eyes to get a stereo image in the middle. But this needs some training ;-)
You can also use Stereo Photo Maker to create a red-cyan image and view it with red-cyan glasses.
Larger "Screen distance" and "image width" creates a stronger 3D effect.
"Screen distance" and "image width" shouldn't be too large because then the unwanted twist also gets more visible.
Ok everything is set up so start rendering all left and right stereo frames.
2. IrfanViewI did the 1 pixel scanline cropping with free programm Irfan View
http://www.irfanview.com/As written above I resampled the images from rendered 2560x1440 to final 1920x1080 for antialiasing.
Via Batch Conversion the cropping process was done for all images of one eye. I cropped the area starting at X-pos 960, so we take the scanline from the middle of our images. Width is 1 pixel which gives best results. Y-pos starts from 0 an we crop the whole height of 1080 pixels.
You can modify stereo effect a bit when you choose a different X-pos for left and right images for instance for left eye images 960 and for right eye images 940. But for most images I choose 960 for both.
We now have 1920 scanlines for left eye and 1920 scanlines for right eye and need to stitch them horizontally.
3. XnViewStitching was done with free programm XnView
http://www.xnview.com/en/xnview/Create - Strip of Images
Add folder for left eye scanlines.
Select "Horizontal alignment"
Click "Create" Button.
All scanlines will be stitched to a 360° image.
Save the final left eye 360° image.
Click "Browser" tab.
Repeat for right eye images.
4. Test via StereoPhotoMaker or cross-eyeYou can check the result with cross-eye method.
You can also use Stereo Photo Maker
http://stereo.jpn.org/eng/stphmkr/ to create a red-cyan image you can view with red-cyan glasses.
5. Top-Bottom setupWhen the result is satisfying you can use Stereo Photo Maker to stack left image on right image so left is top and right is bottom.
Well this stack is 1920 x 2*1080 = 1920 x 2160 so we have an aspect ratio of 16:18 but not 16:9.
YouTube prefers the shrinked 16:9 version:
https://support.google.com/youtube/answer/6316263?hl=en&ref_topic=2888648But my 1920 x 2160 worked well so I think both is possible.
6. Animation setupUsed commercial Magix Video deluxe to compile the images into an animation.
Used free gstreamer to create an H264/MP4 file.
7. google metadata toolUse google metadata tool:
https://support.google.com/youtube/answer/6316263?hl=enClick "Spherical"
Click "3D Top-bottom"
Projection is Equirectangular
Open the MP4 and save the injected version.
8. YouTube uploadUpload to YouTube as usual. You don't have to setup anything because of injected metadata. But it takes some minutes after upload before 360° mode is activated.
Hope there will be a future version of Mandelbulb 3D that has a 360° stereoscopic 3D camera mode. This mode has to implement that scanline process to create the 360° image. Then it would take five minutes and not two days to create such an image. 360° stereoscopic 3D animations would be possible.


