|
Duncan C
|
 |
« on: September 25, 2009, 04:42:59 AM » |
|
|
|
|
|
|
 Logged
|
Regards,
Duncan C
|
|
|
|
twinbee
|
|
« Reply #1 on: September 28, 2009, 05:28:10 PM » |
|
Great work Duncan - it's hard to choose between this and your "Fractal Monoliths" pic.
The perspective on this is really nice too! I still need to update my own renderer to allow any kind of perspective...
|
|
|
|
|
Logged
|
|
|
|
|
Duncan C
|
|
« Reply #2 on: October 02, 2009, 03:40:55 AM » |
|
nice job dude
i like it
how can i make this ??
Jack I created it with a Macintosh applications that I wrote myself called FractalWorks. If you have a Macintosh you can download it and try it yourself at the following link: http://web.mac.com/dchampney/Site/FractalWorks.htmlRegards, Duncan |
|
|
|
|
Logged
|
Regards,
Duncan C
|
|
|
|
Duncan C
|
|
« Reply #3 on: October 03, 2009, 04:11:54 AM » |
|
Great work Duncan - it's hard to choose between this and your "Fractal Monoliths" pic.
The perspective on this is really nice too! I still need to update my own renderer to allow any kind of perspective...
twinbee, Thanks for the kind words. It is pretty similar to the Fractal Monoliths image. I also created a crosseye stereogram version and a red/cyan anaglyph version: 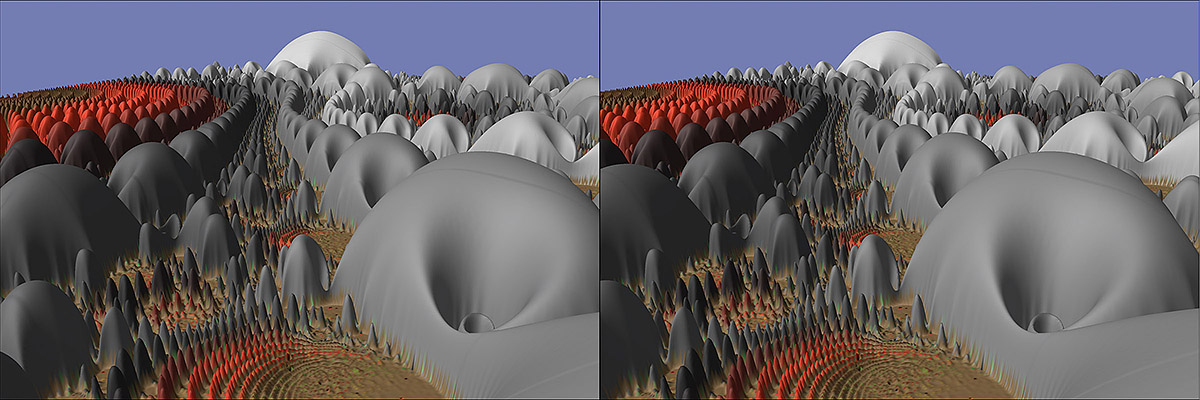 To view a crosseye stereogram, sit at a comfortable distance from your monitor and look at the dividing line between the images. Then hold your finger about halfway between your eyes and the screen so it appears just at the bottom of the image. Then look at your finger and slowly move it closer to your nose. This will cause you to cross your eyes. As your finger gets closer to your eyes, the left and right images will cross over and at some point you should see a stereoscopic view in your field of vision between the two images on the screen. It takes a little practice. Once you are able to see the stereo image, you should be able to hold your eyes in position and remove your finger. 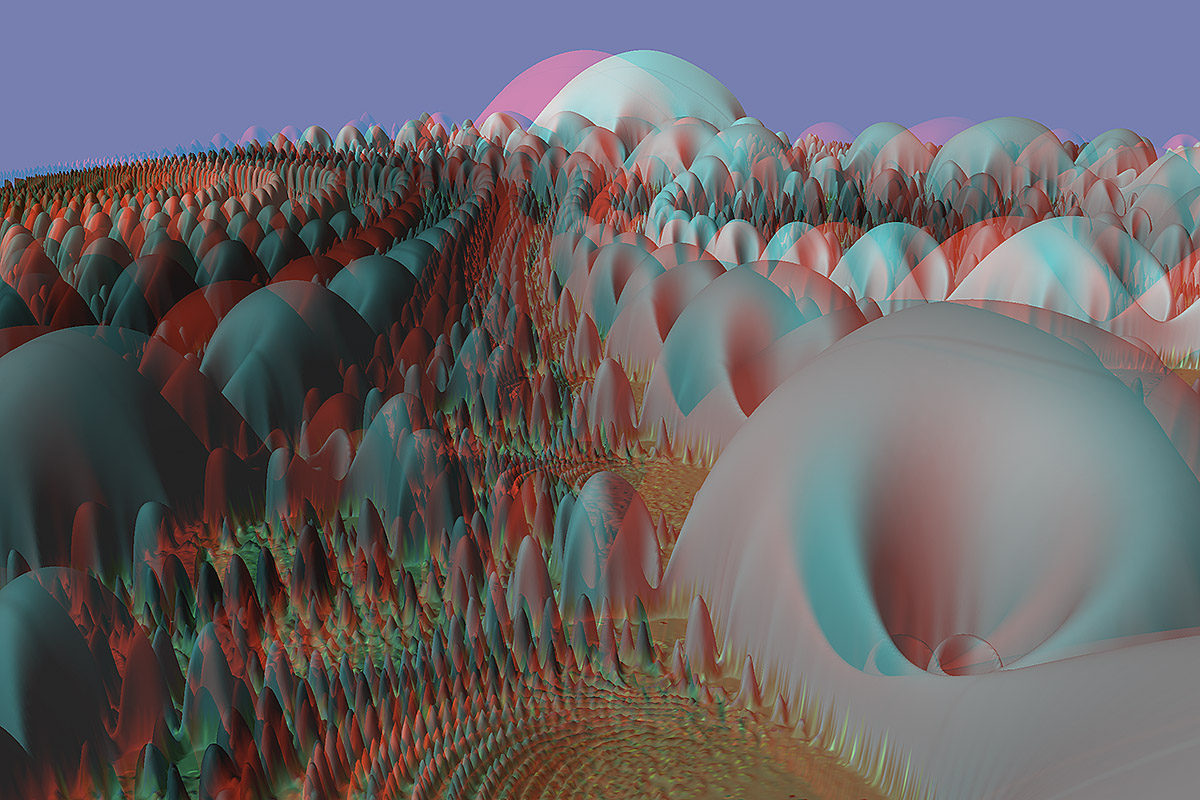 |
|
|
|
|
Logged
|
Regards,
Duncan C
|
|
|
|
twinbee
|
|
« Reply #4 on: October 27, 2009, 10:42:29 AM » |
|
Hi Duncan, This could look so cool, but the seperation distance isn't properly there (you have done it better before - e.g. here). If you compare either to the stereo on this for example: http://aleksandarrodic.com/renderman/images/broccoli_stereo.jpg(created by Aleksandar Rodic). This picture has the most effective 3D effect I have ever seen with 3D glasses. It's practically a standard now  I can say with 99.9% confidence the reason the 3D stereo effect in yours looks so flat in comparison is because the foreground and background elements move about the same number of pixels. One may have just as well offset all the pixels for the second view by 30 pixels or so (I've done a lot of pictures of this kind myself and a good technique is not just to move the camera more left/right, but also to *point* the cameras inwards so that each camera view 'crosses paths' - think Ghostbusters. You should see a massive difference if you try that). Look forward to the rerender  |
|
|
|
« Last Edit: October 27, 2009, 10:58:50 AM by twinbee »
|
Logged
|
|
|
|
|
Duncan C
|
|
« Reply #5 on: October 30, 2009, 11:42:58 PM » |
|
Hi Duncan, This could look so cool, but the seperation distance isn't properly there (you have done it better before - e.g. here). If you compare either to the stereo on this for example: http://aleksandarrodic.com/renderman/images/broccoli_stereo.jpg(created by Aleksandar Rodic). This picture has the most effective 3D effect I have ever seen with 3D glasses. It's practically a standard now I can say with 99.9% confidence the reason the 3D stereo effect in yours looks so flat in comparison is because the foreground and background elements move about the same number of pixels. One may have just as well offset all the pixels for the second view by 30 pixels or so (I've done a lot of pictures of this kind myself and a good technique is not just to move the camera more left/right, but also to *point* the cameras inwards so that each camera view 'crosses paths' - think Ghostbusters. You should see a massive difference if you try that). Look forward to the rerender Twinbee, That image you posted is stunning, you're right. I wish I knew what tricks the creator used to get such awesome 3D. My approach is straightforward, but somewhat hit-or-miss with anaglyphs. I create left and right eye views using 3D projection. I am confident that that part is mathematically perfect. I have adjustments for the eye separation and for the apparent "zero point" of the image (the point that appears on the surface of the screen.) My app goes to some pains to find the points in the image that are closest to and furthest from the viewer at the object's current orientation. By default, the closest point is placed on the surface of the screen, with everything further from the viewer appearing to recede into the screen. You can also place the "zero point" in the middle of the image, or even place the image so it appears to float completely in front of the screen. The latter is rather hard on your eyes however, so I tend to put the image mostly (or completely) behind the surface of the screen. The real challenge is colors. My app takes a fairly simple-minded approach. I strip everything but the red channel from the left eye view, and strip all the reds from the right eye view. This approach works for the most part, but it has limitations. It can cause ghosting. Also pure whites, pure blacks, and colors that completely lack red or completely lack both blue and green don't look very good. Thus I have to tweak my image colors to avoid those "problem" colors. Regards, Duncan |
|
|
|
|
Logged
|
Regards,
Duncan C
|
|
|
|
twinbee
|
|
« Reply #6 on: October 31, 2009, 02:30:29 AM » |
|
I wish I knew what tricks the creator used to get such awesome 3D. Maybe you did this for your latest image, but like I said before, angle the cameras so they 'cross each other'. To compensate for this, you may also need more camera separation distance (I forgot to say that properly before). You want it so that when you switch between the two images, the background moves in the opposite direction to the foreground (in other words, the back (or top) of the image may move right, and the front (bottom) would move left. Or vice versa). Does that make sense? Either that, or where the foreground doesn't move at all, but the background moves quite a lot. There has to be a contrast. For the flat picture on this thread, the foreground and background both move right or left in the same direction, by the same number of pixels, hence the poor 3D effect. I spent ages before I realised this years ago. Honestly, it really does work. If you want to make the final 3D image a piece of cake, you may want to try my own anaglyph/stereogram software. It takes 2 colour images, and outputs the best possible red/cyan picture: http://www.skytopia.com/software/stereopticaI researched the colour thing for ages, so you may find the results surprisingly good. It uses shell, but has full documentation, and is very easy to use. I'm in the middle of adding a GUI to make it even easier. |
|
|
|
« Last Edit: October 31, 2009, 02:40:18 AM by twinbee »
|
Logged
|
|
|
|
|
Duncan C
|
|
« Reply #7 on: November 02, 2009, 06:21:55 PM » |
|
I wish I knew what tricks the creator used to get such awesome 3D. Maybe you did this for your latest image, but like I said before, angle the cameras so they 'cross each other'. To compensate for this, you may also need more camera separation distance (I forgot to say that properly before). You want it so that when you switch between the two images, the background moves in the opposite direction to the foreground (in other words, the back (or top) of the image may move right, and the front (bottom) would move left. Or vice versa). Does that make sense? Either that, or where the foreground doesn't move at all, but the background moves quite a lot. There has to be a contrast. For the flat picture on this thread, the foreground and background both move right or left in the same direction, by the same number of pixels, hence the poor 3D effect. I spent ages before I realised this years ago. Honestly, it really does work. If you want to make the final 3D image a piece of cake, you may want to try my own anaglyph/stereogram software. It takes 2 colour images, and outputs the best possible red/cyan picture: http://www.skytopia.com/software/stereopticaI researched the colour thing for ages, so you may find the results surprisingly good. It uses shell, but has full documentation, and is very easy to use. I'm in the middle of adding a GUI to make it even easier. Twinbee, Crossing the cameras is actually not the correct way to go. It's called "toe-in." That creates parallax problems. It makes it so you throw away less of the edges of the image, but it is not the correct way to go. I have studied this at some length. See the following link for a discussion of camera toe-in versus off-axis projection: http://ozviz.wasp.uwa.edu.au/~pbourke/miscellaneous/stereographics/stereorender/Regards, Duncan C |
|
|
|
|
Logged
|
Regards,
Duncan C
|
|
|
|
twinbee
|
|
« Reply #8 on: November 02, 2009, 09:06:35 PM » |
|
That's interesting. Perhaps it's not strictly accurate, but it's a very good approximation, at least in my experience, and it takes seconds (and is very easy to do). I doubt one would see much overall difference in quality with a more accurate approach. Still, a comparison would be nice.
Nevertheless, I'm interested to know the 'correct' way of doing it - I'll study that link you posted - thanks.
|
|
|
|
|
Logged
|
|
|
|
|
Nahee_Enterprises
|
|
« Reply #9 on: January 09, 2010, 12:32:55 AM » |
|
I created it with a Macintosh applications that I wrote myself called FractalWorks.
It is pretty similar to the Fractal Monoliths image. I missed this image before. Glad I came back and started looking over some of the past few postings. This one is really very good. Thanks for sharing it with us. |
|
|
|
« Last Edit: September 14, 2013, 10:41:30 AM by Nahee_Enterprises »
|
Logged
|
|
|
|
|


